
I knew my mom and sister would think the piece was cute when I texted a photo, but I had no idea that my brother-in-law would be so excited about it. I decided that night that I wanted to create the Seattle skyline with Seahawk colors for Todd's Christmas present. My husband and I grew up in Seattle and are diehard Hawk fans, as is Todd. I knew collecting that many buttons wasn't going to be easy, but I had no idea just how hard or expensive it would be! Thrift shops just didn't have many, if any, button collections. Plus, since I decided I wanted only blue and green, I really limited myself to purchasing mostly new buttons anyway. I began shopping sales at the fabric and craft stores.
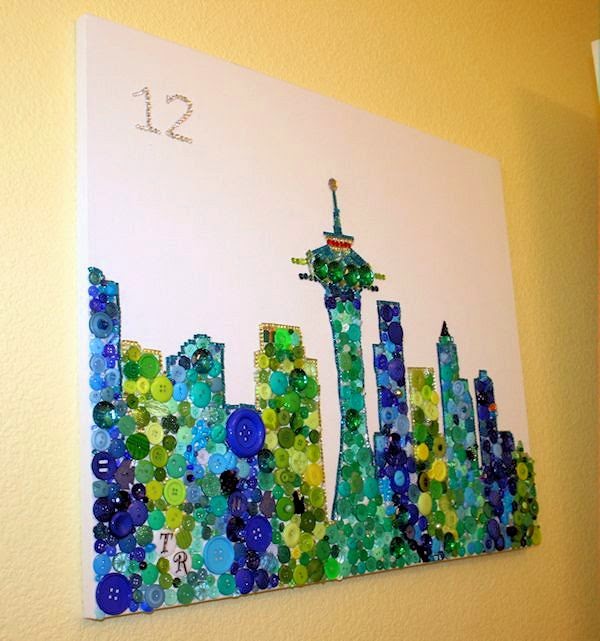
To get started, I purchased the large canvas and made a length of white paper to fit it horizontally by taping together three sheets of 8.5 x 11 printer paper side-by-side. I then drew the Seattle skyline from one end to the other with the Space Needle in the center. I cut out the skyline and laid it on the canvas to use as a template. I traced lightly around the template in pencil and then I was ready to lay out some buttons!
I must have laid out buttons in different color combinations and patterns a dozen times, but ended up dumping them off every time. I finally put the piece away for awhile when my family came from Seattle to visit and I didn't want Todd to see what I was doing. When I finally got back to the project, it was when I could do a massive after-Christmas button-aisle cleanup at Joann Fabrics. They had the best button selections at the best sale prices, and then I purchased all the gemstones I used at the Craft Warehouse.
I started laying out buttons and the pattern emerged. I didn't second-guess it this time. The skyline is made up of approximately 1000 buttons and gemstones. I placed a few "Easter Eggs" in the piece as well. There is a bead with a letter on it for everyone in the family: my sister, her three kids, my husband, our two kids, our mom and dad, and Todd's mom and dad. Todd doesn't have a bead, he has two large white buttons with both his initials "T" and "R". I threw in a little black cat button for luck, a black high-heeled shoe (if you know me, you know I'm all about the high heels), a four-leaf clover (our Irish heritage), a couple of fish buttons (Seattle means fresh fish at Pike Place Market) and a tiny Swarovski crystal beaded football in Seahawk colors. We used clear crystals to create a number 12 in the sky.
This was a labor of love and it was so hard to keep it a secret from Todd, but I'm so happy with the end result and even more happy that he loves it too.


+%23329994+sized.jpg)
