Sunday, October 28, 2012

Halloween Hijinx


Sophie and I spent a couple days this week making treats for her friend's Halloween party on Saturday.  I think the sudden rain (after a summer of barely recordable rainfall) wreaked havoc on my body, brain and specifically my gluten free cupcakes.  It's often difficult to bake gluten free while it's raining, so I wasn't too surprised when the first dozen wouldn't set up properly.  I made some temperature and time adjustments and the second pan came out almost perfect.  The third dozen was a completely new batter, with a little tweak, and it was perfect!  After removing the muffin tin from the oven I set a cooling rack over the top of the cupcakes, and then, just like every cake or cupcake before it, I grabbed both the rack and tin and flipped the whole mess upside down.  Or at least I attempted to.... Apparently my hands were worse than I thought, because they didn't hold onto any piece of that puzzle, and everything clattered to the floor in a spray of fresh, hot pumpkin cake.

Interestingly enough, this post isn't about baking.  It's about the decorating of the cupcakes.  You know, the easy part.  Plus, after dropping a dozen perfect cupcakes on the floor, how much worse could it get?  Okay, don't answer that.  This post is more like a warning to those like me, who are always up for trying something new, even if you know that the best idea in a particular situation would be to do what you know.  If you're a Pinterest fan, this is about good pins going bad.

The original plan was to make two kinds of cupcakes.  A chocolate cupcake decorated with chocolate frosting, Oreo cookies and Reese's Pieces (I used M and M's due to nut allergies) to look like owls.  The second cupcake was going to be pumpkin cake with a neon green buttercream swirl and an adorable witch's hat made from decorative cupcake liners.

The owls were fun and adorable.  Sophie did all the decorating herself!  After making these though, I have concluded that the original photo pinned for this treat had to have been Photoshopped.   Not ONE Oreo cookie came apart without leaving cookie specks in the fluffy stuff.

Original Pin:

Our Finished Product:


Even though our owls look like they've had a long night, they were easy, fun and most important of all, Sophie is very proud of her work.


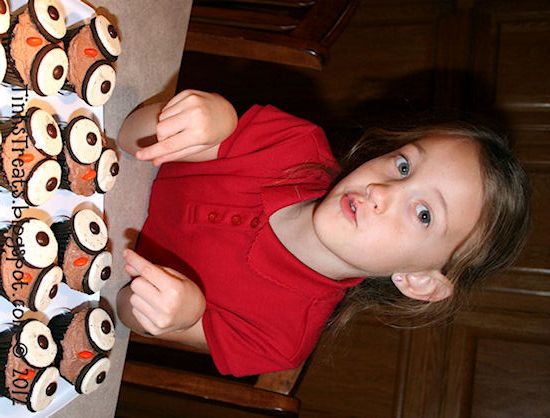
Hoo-Hoo!  Who rocks the cupcakes?!


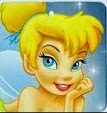
After the owls turned out so cute we were excited to make the witch hats that we found in this pin:


The plan was to make another batch of buttercream frosting and tint it neon green, but at the last minute I remembered a pin for marshmallow buttercream, so I decided to make that instead.  Here's the original pin.  Note that the photo looks like a classic buttercream consistency.


Unfortunately, the recipe resulted in what I would consider a sugar cookie glaze; definitely not a decorator frosting.  I really wanted the swirled look with the witch hat set on top, but the marshmallow icing was just too soft.  Adding extra powdered sugar made it too sweet, so we opted to spread it on with a spatula and then add the hat.  However, without a tall swirl to support the toothpick inside the hat, the witch hat just sunk down into the icing.  That's when I remembered another pin that I thought I could take inspiration from.

An adorable marshmallow Frankenstein!


I removed the witch's hat from the cupcake.  I stuck a new toothpick into a marshmallow and dipped it into the neon green marshmallow glaze.  Then I dipped the top of the marshmallow into black sprinkles to make "hair", and placed the marshmallow Frankenstein on the cupcake.  I stuck two mini-chocolate chips on the marshmallow for eyes.  It was awesome!  For about 30 seconds.  By then the hair had slid down considerably, and his eyes were floating in a puddle of icing atop the cupcake.  It was disastrous, but I don't give up easy, so I quickly grabbed the witch's hat and plopped it down on top of Frankie's head.  We decided to call it a melting witch.

But, within a few moments the whole thing looked like the series of mistakes it was, and we knew we couldn't pass it off as anything we would be proud of.
So.... onto plan... oh, I don't know.... C or D?  I've lost count by now, and it's going on 10 o'clock, so we've just got to do something quick!

Going with the Frankenstein theme, I knew I'd seen several versions in krispy treat form.  So we whipped up a batch of Rice Krispy treats, cut them into rectangles, and then I spread them with the marshmallow icing while Sophie cut up sour gummy worms for neck bolts.  Then she sprinkled on hair, put M&M's on for eyes and noses and then used a tube of black icing to finish off the eyes and make crooked mouths.


All in all, they turned out really cute.  If I do them again though, I'll make a double batch so I can make each Frankie a little thicker.  This time I pressed them into a jelly roll pan so that I could get as many as I could, but it made them a little too thin to keep from folding over when room temperature.

The party was great and the treats were a hit!  Here's my Spider Girl and her BFF Little Kitty!


Saturday, October 6, 2012

Smoked Tomato Chili


I've been lucky enough to inherit another gadget from my mom.  She gave me her Brinkman charcoal smoker.  A couple friends and I have been buying and enjoying a rarely stocked brand of smoked tomato hummus.  All summer I kept talking about smoking my own tomatoes, dehydrating and grinding them into powder to use in homemade hummus.  When I finally had the opportunity to get the smoker from Seattle to Boise, I jumped at it!  My friend drove up for a family visit and on the way home she stopped by mom's house to pick up the smoker. 

The best part of my first smoking experience was that mom came down to visit a week after the smoker arrived, and we were able to do the testing and creating together!  We smoked lots and lots of tomatoes, jalapenos, a brisket and a chicken.  We made delicious batches of hummus and salsas with the smoked tomato and jalapeno powders.  I've got some more testing to do before I am satisfied with the hummus and salsa recipes, but one recipe that hit the target the first time out was my smoked tomato chili.
I read all about how to make your gas or charcoal BBQ a smoker, and we've smoked fish on the gas grill in the past, but I was still nervous about doing it on anything but a smoker.  The Brinkman is super easy to use, although now that I've had a look at some of the newer, fancier smokers, if I decide to get really serious about this, I might just have to give mom hers back and invest in a new one. 


We smoked several batches of tomatoes.  We tried organic store-bought tomatoes that were large, and we tried home-grown tomatoes that were relatively small.  Although I'd much rather use tomatoes from my aunt's garden, the small ones easily slipped down through the grill racks, while the large, store-bought ones stayed put. 
After washing and slicing the tomatoes, we removed the seeds and placed them cut-side down on the grill grates that were sprayed with non-stick cooking spray.  I simply sliced the jalapenos in half length-wise and put them on cut-side down also, but I think they could smoke whole too.  I left the seeds in the first time, but in the future I think I'll take them out while I'm doing the tomatoes.

The tomatoes smoked for about 3 hours, and since we did several batches we tried different flavors of wood chips, including cherry, apple, mesquite and a combination of mesquite, hickory, oak and cherry.  Our favorite flavor on the tomatoes was the plain mesquite.  After smoking we removed the tomato skins, which mostly just fell off, like when you char a bell pepper in the oven.  Hmmmm..... smoked bell peppers!  :idea:

The smoker can be used with any lighting technique, but mom had bought an electric starter with it, so that's what we used.  I'll be honest, I'm much more comfortable with just another electric gadget than I am lighter fluid and matches.  So, we loaded up the bottom bowl of the smoker with the electric element and a pile of briquets.  The electric element began to glow like an oven or toaster element, and soon the briquettes were glowing and starting to ash over.


When the briquettes were hot enough we removed the electric starter and added either wood chips or wood pellets directly to the briquets.  Then we set in the second bowl above the briquettes and (carefully) filled it with water or another liquid.  You can use any liquid, or combinations of liquid, from water and broth to beer and wine, and even marinades.  We tried several variations over the course of the week.


The fresh garden tomatoes were wonderful, but they were too small to keep from dropping down through the grill grates.  They land in the water bowl below instead of onto briquettes, but I felt like we were losing out on precious tomatoes when it happened.


The organic store-bought tomatoes were large enough to hold their own on the smoker, so we did several batches of those.  I couldn't help but throw on some jalapenos too, just for fun. 


Fun fact: Regardless of my Teflon mouth, biting into a freshly smoked, non-seeded jalapeno was NOT a good idea.  I eat jalapenos with seeds raw all the time!  Why was the smoked one so potent?!  Well, for the first time ever my family got to see me cry from a pepper.  I tamed it with snap peas dipped in buttermilk ranch, but what did my family do?  Laughed their butts off, that's what!


These were our first beef brisket and whole chicken.  With the convenience of two grill racks we could put the meats on the lower rack and continue smoking tomatoes on the upper rack. 


My first perfected recipe creation using our smoked tomatoes is Smoked Tomato Chili


Of course this recipe could be made substituting with smoked paprika or fire-roasted tomatoes, but if you have an outdoor grill at home, I encourage you to try the smoked tomatoes.
For further investigation of the smoking process, feel free to visit the Grilling, Smoking & BBQ Forum at Food.com.
Creative Commons License
TinksTreats by Lorilyn Tenney is licensed under a Creative Commons Attribution-NonCommercial-NoDerivs 3.0 Unported License