

Wednesday, December 21, 2011


Monday, December 19, 2011
Glass-like Photo Key Chains

Do I always wait til the last minute to make handmade gifts? Nooooo..... it's just that I'm not an idea girl, but give me an idea and I'll make it happen. Like creating recipes, sometimes the ideas take more than one... or two... attempts before the result at least resembles what I have visualized.
This year I was stumbling on gifts for the men in the family. I had an idea, inspired by some key chains I found on Pinterest. Well, I tried the original idea but wasn't happy with the outcome, only because I didn't have some of the proper hardware on hand and also because I was trying to make them as manly as possible, but the craft was really screaming to be girly.
Next I tried an idea from one of the comments on that project. It worked and I was going to go with it. Then I Mod Podged over the carefully stamped, punched and positioned (with tweezers!!) the 1/4-inch letters for 3 kids' names and the word "family". The Mod Podge smeared the craft ink on all the letters. I was incredibly frustrated, but after two attempts I wasn't about to give up now. I put a bandanna on my day-old hairdo, re-braided my daughter's hair (she totally looked better than I did!) and we ran out to the Craft Warehouse for some new inspiration and supplies. I was still going to go with the plastic hang-tag type key chains, I just needed to purchase more of them. It was funny though, how all the time I was working on this project I kept thinking to myself that I should get out the epoxy resin and cover the key chains with it instead of just Mod Podge. Of course, I didn't... for some reason I can't explain, but then again, if I had then I wouldn't have found myself at the Craft Warehouse staring at bottle caps filled with resins.
A display in the jewelry area caught my eye. I love the smooth, glassy look of resin and have used it many times, so when I saw the insides of the bottle caps decorated with stickers, gemstones and beads, then filled in with the clear, glassy resin, I fell in love and knew I had to adapt this technique for my purposes.
I found some pendant casings (I don't know what else to call them) and matched up appropriate sizes for the photographs I wanted to incorporate into the key chains. I bought some key chain clip doohickeys (yes, don't know what to call them either - I'm a total nube when it comes to making a key chain) and we headed home! Oh...well, we did flit around the store a little longer, restocking the paint that Sophie & Delaney have been using up like crazy (mostly painting my kitchen table and their clothing with it, but whatever) and picking up a few other cool craft stuff.
So, instead of using the epoxy resin compound I've used in the past, I bought a $6 bottle of stuff called Glossy Accents.

Glossy Accents by Inkssentials on Rangerink.com
Basically the same exact effect without the mess of cups and tongue depressors, stirring frantically to mix the two kinds of goop and then having to wipe drips off the edge of the piece for hours. With the Glossy Accents you just squeeze it out. As Sophie would say, "Easy Peasy Lemon Squeezy!"
We ran home, printed new photos on glossy paper, cut them to size, Mod Podged the fronts and backs (drying between each side) and then placed them into the key fobs. Then squeezed the Glossy Accents to fill up the rest of the fob on top of the photos. They were dry within about 5 hours, but I still left them overnight, just in case. I'd already learned my lesson when I didn't wait long enough between the Mod Podge and accidentally glued my brother-in-law's face to the scratch paper. I wondered for half a second if he would notice his right ear was missing... then reprinted the photo and started over. lol We made two identical ovals and one round one for all three of the wonderful brothers I have inherited.
I'm so excited about the possibilities now for girly ones that Sophie & I are off to buy more supplies at what Bryan has taken to calling the Crap Warehouse. But even he gets excited when he sees the stuff that I make. I think he secretly likes the place, but I understand that browsing stickers, stamps, beads, fabric and artificial flowers when you don't have a mind that can visualize the end result, might get pretty boring after awhile. I don't mind his nickname, I call it that myself quite often, cause I can't just go there for one thing. I DO come home with a bunch of crap that I don't know for sure what it's going to become. He indulges me by helping me try to organize my crap... I mean, craft room.
Sunday, December 18, 2011
Sophie's Scooby Snax
I don't usually have pet gifts on my To Do list for Christmas, but this year we have only one dog left in the family and one dog that I WISH was my family. Being highly allergic to animals makes bonding with any a bit difficult. Cats generally love me and I've had several that will actually crawl into my purse for a quick nap. Yeah, now that my sister has gotten me addicted to Vera Bradley purses, made entirely of fabric, bringing home one that has had a cat sleeping in it means I need to wash it or pack it away. :/
Anyway, dogs really aren't my thing and if I could live with an animal I would choose a cat. But, life likes to prove us wrong once in a while and in this case the proof is Ella; a loving, gentle Boxer belonging to Sophie's BFF, Delaney.

So, this year Sophie and I got the idea to make treats for our two favorite fur-babies. I found this recipe for Doggies Favorite Peanut Butter Treats, posted to Food.com by scotty's mom. The recipe was super easy, we had everything on hand, and one of the 13 glowing reviews was left by a chef that has very similar taste in recipes to myself. I trust her judgment and looked no further.
We mixed up the dough in the Kitchenaid mixer and started rolling. I have a cookie cutter in the shape of a bone that I had actually bought a few years ago for Halloween treats, and it was going to be perfect for this gift.


We bought a couple empty metal tins to hold the treats. I did some creative lettering and water-coloring for each of their names to personalize the tins.
I don't know yet how Trigger and Ella will like these, but we're excited to find out! :)


Anyway, dogs really aren't my thing and if I could live with an animal I would choose a cat. But, life likes to prove us wrong once in a while and in this case the proof is Ella; a loving, gentle Boxer belonging to Sophie's BFF, Delaney.

So, this year Sophie and I got the idea to make treats for our two favorite fur-babies. I found this recipe for Doggies Favorite Peanut Butter Treats, posted to Food.com by scotty's mom. The recipe was super easy, we had everything on hand, and one of the 13 glowing reviews was left by a chef that has very similar taste in recipes to myself. I trust her judgment and looked no further.
We mixed up the dough in the Kitchenaid mixer and started rolling. I have a cookie cutter in the shape of a bone that I had actually bought a few years ago for Halloween treats, and it was going to be perfect for this gift.


We bought a couple empty metal tins to hold the treats. I did some creative lettering and water-coloring for each of their names to personalize the tins.
I don't know yet how Trigger and Ella will like these, but we're excited to find out! :)


Wednesday, November 30, 2011
Santa's Beard Advent Calendar

Mom was in town for the last 12 days, and even though it was for Uncle Bob's funeral service we still found time to become addicted to Pinterest. I think that took all of 12 minutes! LOL
We are "pinning" things to our boards like crazy, all the while mumbling about how we're never going to actually get any of these cute crafts or recipes done. But I'm proud to say that I just accomplished my first Pinteresting craft idea!
I had been looking at and pinning homemade advent calendars. I really don't like the idea of the chocolate-filled calendars.... okay, maybe I do. But clearly that's the problem. If my sister & I were able to eat through Christmas on December 1st, then I'm pretty sure my 5 year old could (WILL)do it now too. So I wanted something different. I saw lots of beautiful calendars, with goody bags, ornaments, etc., but I was grumbling about the cost of 25 new ornaments, and the time to shop for and fill 25 goody bags.
THEN.... I saw a pin for an advent calendar that was something both my daughter and her BFF could make, with just stuff already in my scrapbook room!
The Santa's Beard Advent Calendar was posted on the Inviting Printables Blog.
I printed out the cute page of Santa's face with numbers of the days, where his beard will be and a poem at the bottom.
I guess my nickname really fits me, cause I can't seem to stop tinkering with stuff. In this case I could see an opportunity for the girls to cut out all the pieces of Santa and glue them on a piece of card stock themselves. Then I stamped the numbers and printed the poem, which I did in Lettering Delights Oz font and changed the wording slightly. Bryan, who is sometimes hit with a totally genius idea, suggested I mat the poem so that it looks like it's a belt buckle. So, that's exactly what I did!
The girls will start tomorrow, gluing on one cotton ball every day of December, covering up the day's number. They are so excited about it and I loved making it with them. It was literally a 20 minute project with just a few basic scrapbook tools and some card stock. :)
*Tink
Let the countdown begin!!

UPDATED December 30th 2011:
As the days of December were ticking by I realized that the poem and the numbers stamped on the calendar aren't really in sync. The last day stamped should be the 24th, as that's the night Santa actually makes his delivery. OR, the poem can be altered slightly to avoid saying that on the last day of the calendar (the 25th) Santa comes. If we repeat this craft next year, I think I'd like to leave the poem intact and only stamp numbers thru the 24th.
As for this year, this was the best advent calendar we've ever done. Sure, Sophie was all over the chocolate one she got too (except... unlike her Mama or her big brother, she was good about only eating one a day), but every morning her first thoughts were to glue on a cotton ball.
I have a set of Christmas coffee mugs that I display around the house, but we never actually use. Sophie chose the Mrs. Claus mug to hold the cotton balls and a glue stick all together, on the counter next to the refrigerator, where Santa was hanging. She really enjoyed this method of counting down and I compared her enthusiasm for and reactions to both this and the chocolate calendar. I actually think this was more enjoyable because she felt she was actively bringing Santa closer by building his beard, whereas the candy or treat-filled calendars just turned into daily, "What did I get?!" moments, as she thrusts the molded candy into our faces to figure out which Mickey Mouse character it's supposed to look like.
This was great fun and I hope to find or invent something similar next year! :)
Here's a photo of Sophie's finished calendar. (The calendar shown above is slightly different than the one below, as the one above is the one I helped her friend cut out, while Sophie wanted to do all her own cutting on hers.)

Friday, September 30, 2011
48 Hours with the Magic Bullet.... PART 3

I know it's taken me a long time to get the final installment for the Magic Bullet posted. I honestly thought I HAD done it. This morning I realized Part 3 was still in the (rather long) list of unfinished Blogger posts! LOL So... drum roll please... Here it is!
The next morning DD woke up and immediately asked where her smoothie was. :lol:
I whipped up the Magic Bullet Strawberry Banana Smoothie (Dairy-Free). This thing took about 2 minutes, start to finish.


Then, I waited til a little later in the day to make Momma's Smoothie. ;)
Magic Bullet Easy Frozen Daiquiri


Next, we tested the Magic Bullet Cheesecake. I'm not even joking when I say that my 5 year old DD actually made this recipe herself. After helping me with several other recipes, she understood the pulse and the lock-on techniques and was able to measure, add and mix the ingredients all by herself.


I've decided that the Magic Bullet recipes with something like, "Seven-Second..." in their title refers to not how long it takes to make it, but how long it's going to last once you serve it. :lol:
That was definitely the case with the Magic Bullet Seven-Second Salsa. I used a lot more tomatoes when making this recipe than it called for, but it was still super easy and very delicious. The photo was taken too soon after making it, as you can see it's a little bit foamy. That settled down, and the 3 teaspoons I was able to save for later were a rich, beautiful red and the longer the salsa was refrigerated, the better it got.


I know when I started this project that I thought this was a gadget geared toward singles and couples, but the more I use it the more I realize how handy it is even for families. I've just always been a "cook for an army" type gal, but we're really bad at eating leftovers. The Magic Bullet is teaching me to make small batches of things that we can enjoy immediately, without worrying about leftovers going to waste.
And something else I discovered... As annoyed as DH was with my constant raving, he never once complained about not having to wash the 4 loads of dishes all this food would have required him to do on any other day. Yep. VERY little cleanup with this gadgie.
Now that I'm at the end of my 48 hours, there are still recipes I'd like to try. Obviously, I'm going to have to purchase a Magic Bullet for myself. Particularly because I didn't get a chance to test out the flat blade, which I wanted to use for grinding fresh coffee beans, but thanks to the invention and our subsequent addiction to the Keurig coffee maker, we rarely get out the old coffee pot anymore. And then there's the juicer attachment, which I wanted to try just to see a juicer in action, but would be enlisting the help of a friend with a more health-conscious palette to test out the finished product for me. I'm not quite ready to start drinking my spinach and beets. :lol:
And now, at the risk of sounding like a commercial, I think every home needs one of these! :D
Thursday, September 29, 2011
48 Hours with the Magic Bullet.... PART 2
Luckily, my family is accustomed to odd meal combinations, thanks to my participation in contests and tag games in the other Food.com forums, so no one even batted an eye when I ate my spaghetti and then started right in on the Magic Bullet Six-Second Chicken Salad. LOL
For this one I didn't have any leftover cooked chicken, so I threw a few tenders on the George Foreman Grill for 5 minutes and then cut them into a few smaller chunks. I quartered the apple and then roughly chopped that. I left the pecan halves whole.

The pulse technique was used again here, but I did find that I needed to do a lot more tapping on the counter top than I did with the spaghetti sauce. Next time I think I'll chop the apples a little more and give the pecans a quick chop.

So, more than six seconds, but still, very easy to make. It made enough for 3 sandwiches on homemade gluten free bread (slightly smaller than average loaf pans), and everyone liked the flavor.

Because I always use tart apples, I made this recipe a second time (to use up the leftover chicken) and added some pomegranate flavored dried cranberries. I made a double batch, using the large cup instead of the small one. I believe the manual warns against putting sticky ingredients in the machine, but of course I ignored that warning. :roll: In the future I will simply stir in the cranberries after the recipe is made, because they did stick to the blades, but the end result was still very good. :yummy:

One of the best things about this recipe was that I could store the leftovers right in the cup I made it in. I simply removed the blade and put on one of the Stay-Fresh Resealable Lids, then popped it in the fridge. It only lasted a couple hours before my 18 year old DS scarfed it down, but what I couldn't stop thinking about was the idea of grabbing a cup of fresh chicken salad before running off to work, storing it in the fridge, and at lunchtime putting it between a couple slices of bread or serving it on a bed of lettuce. A super easy meal that wasn't bought out of a vending machine or didn't include the words "power bar" on the package!
For this one I didn't have any leftover cooked chicken, so I threw a few tenders on the George Foreman Grill for 5 minutes and then cut them into a few smaller chunks. I quartered the apple and then roughly chopped that. I left the pecan halves whole.

The pulse technique was used again here, but I did find that I needed to do a lot more tapping on the counter top than I did with the spaghetti sauce. Next time I think I'll chop the apples a little more and give the pecans a quick chop.

So, more than six seconds, but still, very easy to make. It made enough for 3 sandwiches on homemade gluten free bread (slightly smaller than average loaf pans), and everyone liked the flavor.

Because I always use tart apples, I made this recipe a second time (to use up the leftover chicken) and added some pomegranate flavored dried cranberries. I made a double batch, using the large cup instead of the small one. I believe the manual warns against putting sticky ingredients in the machine, but of course I ignored that warning. :roll: In the future I will simply stir in the cranberries after the recipe is made, because they did stick to the blades, but the end result was still very good. :yummy:

One of the best things about this recipe was that I could store the leftovers right in the cup I made it in. I simply removed the blade and put on one of the Stay-Fresh Resealable Lids, then popped it in the fridge. It only lasted a couple hours before my 18 year old DS scarfed it down, but what I couldn't stop thinking about was the idea of grabbing a cup of fresh chicken salad before running off to work, storing it in the fridge, and at lunchtime putting it between a couple slices of bread or serving it on a bed of lettuce. A super easy meal that wasn't bought out of a vending machine or didn't include the words "power bar" on the package!
48 Hours with the Magic Bullet.... PART 1

We've had several threads on Food.com regarding the Magic Bullet or Rocket Chef gadgets. They seem very popular, but aside from emailing the Magic Bullet manual that Chef marisk was kind enough to share with us to everyone needing one, I was really of no use when it came to answering questions about the machines.
Recently though, the subject came up on one of Sophie's preschool play dates. It turns out that they have a Magic Bullet and were more than willing to loan it to me so I could play with it and create a photo demo for the Kitchen Gadgets & Appliances forum.

The full set includes: the power base, a tall cup, a short cup, 4 party mugs, a cross blade, a flat blade, a blender and lid, a juice extractor kit (extractor and plunger or tamper), two shaker/steamer tops, two stay-fresh lids for storing leftovers and 4 colored comfort lip rings to use with the party mugs.
Cleanup is easy, as all pieces are dishwasher safe except the power base, which can simply be wiped down.
Initially, I considered this gadget to be just another As Seen On Tv gadgie that would end up in a box in my Appliance Graveyard (aka: the garage), but after giving it a test run with the first two recipes, I have a more informed opinion.
I can see how the Magic Bullet would be the perfect gadget for single people, couples, or college students.
Although it sounds strange, I think it would also be handy while traveling and staying in hotels. It may not be convenient to travel with all of the pieces, but you could easily get by with just a few of them. I suggest that idea because I have a friend that will sometimes travel for work, but because she has to eat gluten free, and finding suitable restaurants is difficult, she ends up surviving on yogurt, energy bars and a little fruit. The hotels don't always have freezers in the rooms, but refrigerators are usually standard and many have microwaves. I'm confident that she could buy a few refrigerated items and using the Magic Bullet, make healthy meals during her trip.
One thing I really like about the MB is that you can use small foods, like cherry tomatoes, whole garlic cloves, and boiling onions, instead of having to chop and dice everything. The more I played with this gadget, the more I fell in love with it and every time I get excited about how easy making and cleaning up is after each recipe, Bryan says, "Just buy one and stop trying to convince me how great it is!"
What started out here as a simple demo has turned into an over-sized review of the Magic Bullet, please forgive the length.
Basically, this is the story of my 48 Hours with the Magic Bullet.
The first recipe we tried was the Im"meat"iate Spaghetti Sauce (Marinara) recipe. I've posted it as Magic Bullet Spaghetti Sauce (Marinara) because Food.com doesn't recognize the air bunnies in the original title.
It was strange working with raw meat in the sauce and then microwaving it to cook the mixture, but aside from a little finer ground texture, the sauce had great flavor and we enjoyed it.
Prepping ingredients is really simple when you "think small". Using cherry (or grape sized) tomatoes, just having to peel a pearl onion and couple cloves of garlic was very quick and painless compared to chopping and peeling full sized tomatoes, onions and mincing garlic.

I used grape tomatoes and ground turkey for this recipe.

Place the cross blade on the cup and then set it on the power base. Press down gently to start the motor, then release pressure immediately. Let the ingredients settle or tap the cup on the counter top to redistribute them and pulse again. Repeat until you've reached the desired consistency.


To cook the mixture, remove the cross blade and twist on one of the vented shaker/steamer lids.

Place cup in the microwave and cook on high for 7-10 minutes. I had my pasta water coming to a boil while gathering ingredients and at this time I was able to put the pasta in the water. Since I was cooking gluten free pasta, which only takes 9 minutes to cook, both the sauce and noodles were done at the same time.
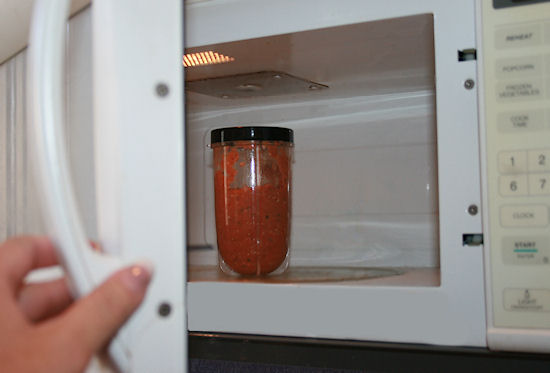
Ignoring the time I took to set up and photograph along the way, the whole recipe took about 15 minutes! :shock:

Subscribe to:
Posts (Atom)
